There’s been a little gap in these for the past week or so, partly due to being busy with Yu-Gi-Oh! Nationals last week, and then just not finding time to catch up on things. On the 17th we saw the final Psycho-Pass cards, whilst this week has been filled with new Little Busters! cards.
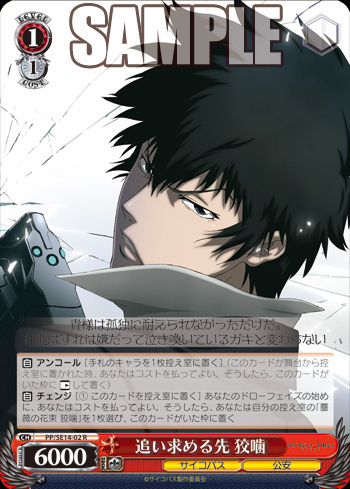
In pursuit, Kogami
Red / Level 1 / Cost 1 / 6000 / 1 Soul / No Trigger
«サイコパス Psycho-Pass» / «公安 Public Safety»
[AUTO] Encore [Place 1 character from your Hand in the Waiting Room]
[AUTO] Change [(1) Place this card in the Waiting Room] At the start of your Draw Phase, you may pay the Cost. If you do so, you choose 1 [Bouquet of roses, Kogami] from your Waiting Room, and place it in the Border this card was in.
The final Kogami card comes with 2 keyword effects, packing both Encore and Change. The former is intended to make it easier to pull off the latter, because with Encore it will be very easy to keep him alive until your next Draw Phase. This will probably be necessary a lot of the time, because 6000 Power is poor for a 1/1. The change effect is relatively cheap, considering it can get out a 9500 Power card, but the requirements to keep him alive for a turn will likely in reality raise this cost, via the discard needed for Encore. Once the other Kogami is out though, you can really start tearing into your opponent’s Stage.
“Smile of a Saint” Makishima
Blue / Level 0 / Cost 0 / 1500 / 1 Soul / No Trigger
«サイコパス Psycho-Pass» /«本 Book»
[CONT] This card cannot be chosen by your opponent’s effects.
[CONT] All of your other «サイコパス Psycho-Pass» characters gains Power +500.
The final Makishima card provides global support for your «サイコパス Psycho-Pass» characters, meaning most of your characters can benefit from him, but unfortunately Akane will miss out. Even then, I reckon most decks will use him. In addition to this, he cannot be chosen by your opponent’s card effects, meaning it’s even harder than normal to get rid of him.
In search of ‘secrets’, Rin
Yellow / Level 1 / Cost 1 / 2000 / 1 Soul / 1 Soul Trigger
«動物 Animal»
[CONT] Your other character in the Centre Stage Middle Border gains Power +1500.
[AUTO] When your opponent adds a character from their Waiting Room to their Hand, you may place the top 1 card of your Deck in Stock.
The week of Little Busters! previews starts with Rin, who can support a single character, whilst also having an interesting way to try and discourage Bond and other salvaging cards. The first effect gives a powerful 1500 boost, but is restricted to only the central Border. This could allow you to have a very powerful wall or attacker, but will leave your other two characters relatively weak. Later on you’ll be able to get equivalent effects for several positions (such as Level support), so you may well want to replace her later.
The 2nd effect allows you to gain a Stock whenever the opponent salvages a card, making it easier to play your more powerful cards in counter attack next turn. It could potentially backfire sometimes though, if you unwittingly place a Climax there, since it will not only prevent a cancel on that turn, but could also get it stuck there with you not knowing any better. If your opponent is worried about you gaining Stock they might hold back on their salvaging a bit, but sometimes it will be necessary for them to do so. You have to consider that some people may simply not care about you gaining Stock.
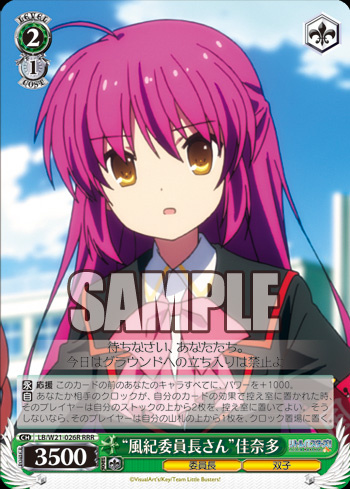
‘Public moral committee president’ Kanata
Green / Level 2 / Cost 1 / 3500 / 1 Soul / 1 Soul Trigger
«委員長Class Representative» / «双子 Twins»
[CONT] Assist All of your characters in front of this card gains Power +1000.
[AUTO] When a card in you or your opponent’s Clock is placed in the Waiting Room due to an effect of a card of its owner’s, that Player may place the top 2 cards of their Stock in the Waiting Room. If they don’t, that Player places the top 1 card of their Deck in the Clock.
Apart from the Colour and attribute differences, this is an exact copy of the famous anti-heal card from Rewrite. Only giving a 1000 Power boost is more than made up for by the fact that it will be a real thorn in the side of Heal heavy decks. They’ll either be drained of Stock, or be unable to heal and stay in the game longer. This instantly moves Little Busters! up the ranks of playable decks.
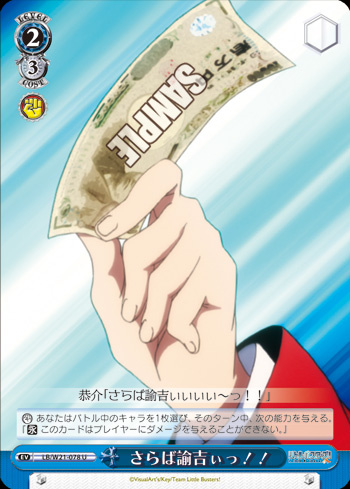
Farwell Yukichiiii!!
Blue / Level 2 / Cost 3 / Counter / No Trigger
Event
[COUNTER] Choose 1 character that is taking part in battle, during that turn, it gains the following effect. [[CONT] This card cannot cause damage to a Player.]
Next we have an unusual Event Counter that can’t actually be used as a normal Event card, due to the timing of playing it. I assume the fact it’s an Event is to enforce colour restrictions and to prevent the card being salvaged and reused. The effect itself will prevent a character from causing damage, allowing you to survive 1 more attack. You’ll ideally save this for what would otherwise be a game ending attack, otherwise it might feel wasted.
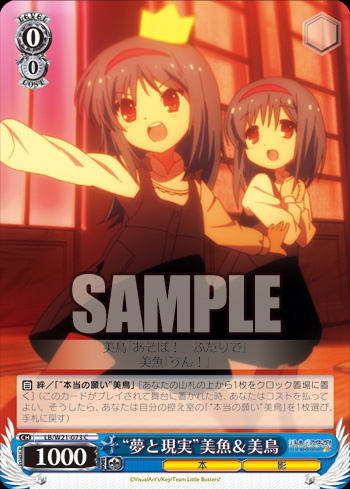
‘Dream and reality’, Mio & Midori
Blue / Level 0 / Cost 0 / 1000 / 1 Soul / No Trigger
«本 Book» / «影 Shadow»
[AUTO] Bond / [‘The real wish’, Midori] [Place the top 1 card of your Deck in the Clock]
Tuesday saw a trio of Mio and Midori cards, and I finally understood the significance of the Mio card that gained «影 Shadow» a few weeks back. The first of the trio is a Bond card that allows you to get back the Level 2 Midori card that follows. Since it requires you to take damage, you can increase your options without giving up any Stock, but it does move you a step closer to defeat.
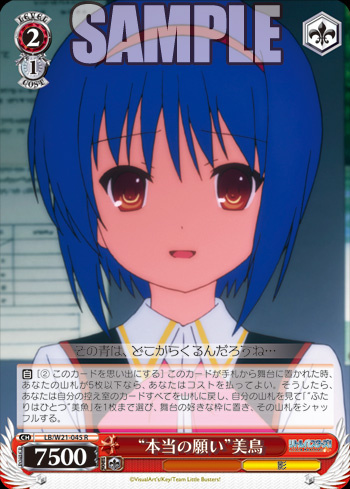
‘The real wish’, Midori
Red / Level 2 / Cost 1 / 7500 / 1 Soul / 1 Soul Trigger
«影 Shadow»
[AUTO] [(2) Place this card in Memory] When this card is placed on the Stage from your Hand, and your Deck is 5 cards or less, you may pay the Cost. If you do, return all the cards in your Waiting Room to your Deck, search your Deck for up to 1 [‘Two as one’, Mio] and place it in any Border on the Stage. Shuffle your Deck.
The Bond target is a Mio who can reset your Deck, thus avoiding Refresh damage, and on top of that also bring out a Level 3 card early. Since you can Bond to this card, you don’t even have to really worry about drawing it, and could even get rid of it in the early game, knowing you can get it back later. Even without the extra effect, the free Deck Refresh is already very useful since any saved damage is important. Getting out a Level 3 card as well is just an added bonus, and it doesn’t mean you have to play the full combo, although it would probably make sense to do so.
With concentration and careful playing you can try to get yourself down to 5 or below cards in your Deck, but you can’t always control when your opponent might shoot you right through this range into a Refresh in a single turn.
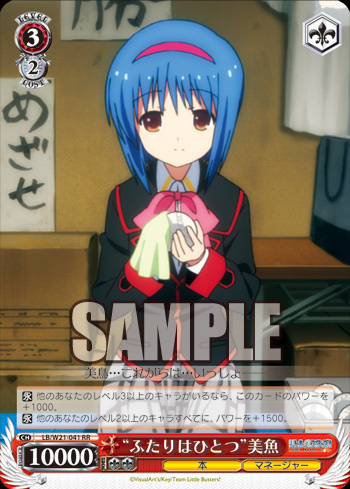
‘Two as one’, Mio
Red / Level 3 / Cost 2 / 10000 / 2 Soul / 1 Soul Trigger
«本 Book» / «マネージャー Manager»
[CONT] If you have other Level 3 or higher characters, this card gains Power +1000.
[CONT] All of your other Level 2 or higher characters gain Power +1500.
The trio ends with a Level 3 Mio who can support your attackers whilst also hitting pretty hard herself. Her first effect means that once you get to Level 3, you can hopefully keep her at a constant 11,000 Power, allowing her to push over many basic Level 3 cards. However you’re unlikely to be able to gain this boost immediately if you played her during Level 2, since it would be hard to get other Level 3s alongside her.
The second effect could help make your other characters become a force to be reckoned with, because she gives as much of a boost as a full strength Level support card does. Multiple copies will make things even worse for the opponent. With 2, you’ll end up with Mios at 12,500, whilst your 3rd character could be at least 13,000 before considering supports. 3 copies would put them all at 14,000 before supports. This would make them very hard to defeat.
The downside to all this is of course the fact that Mio doesn’t do anything other than provide Power, and won’t do things like help keep you in the game longer, like other Level 3s do.
‘Little Busters’ Kengo & Masato
Yellow / Level 2 / Cost 2 / 9000 / 2 Soul / 1 Soul Trigger
«筋肉 Muscle» / «スポーツ Sports»
[CONT] The Character opposite this card gains Soul +1.
[AUTO] When this card attacks, during that turn, this card gains Power +X. X is equal to the Soul of the card opposite this x 1000.
Kengo and Masato team up for an interesting Level 2 card that can become pretty powerful, but can also be very risky. The first effect which grants their opponent an extra Soul will likely lead to you taking extra damage, but does slightly increase the chance of you cancelling damage. It does however also make their second effect even stronger, by making sure they’ll gain an additional 1000 Power. This means that they’ll be facing what are normally Soul 1 cards as an 11,000 and what are normally Soul 2 cards as a 12,000.
This potentially allows them to take on a lot of Level 3 cards, and should allow them to handle most things below that. You just need to be wary of the potential to lose faster in the process.
Natsume x Naoe
Yellow / Level 0 / Cost 0 / 1000 / 1 Soul / No Trigger
No Attribute
[AUTO] [(2)] When this card is placed on the Stage from your Hand, you may pay the Cost. If you do so, search your Deck for up to 1 Level 2 or higher character, reveal it to your opponent, and add it to your Hand. Shuffle your Deck.
Mio’s imagination has brought forth a search card for Little Busters! that could help setting up for later in game. A little while ago we saw a Makishima that did the same, just with a 1 Stock and 1 damage Cost instead. So this card can be used in much the same way, it just requires a greater Stock investment, and it doesn’t push you closer to losing the game.
The ability to search for higher Level cards without an attribute restriction means that this card could find use in any deck if you chose to play it, since it will allow you to set up for the late game. Whether you decide the Stock is worth it is another matter though.
Fly to the classroom
Red / Level 2 / Cost 1 / No Trigger
Event
If you have characters with 3 or more different Colours on your Stage, choose up to 3 characters from your Waiting Room and add them to your Hand, place 2 cards from your Hand in the Waiting Room.
Continuing the 3 colour theme from the 16th, we have an event card that requires 3 different colours to be used, but allows for mass salvaging. Being able to get back any 3 characters from your Waiting Room is a pretty powerful effect, since it could completely set you up for the later game, or give you exactly the cards you need to dig yourself out of your current situation.
However, since you give up 2 cards afterwards, it results in no net gain of resources. You do at least get to dump less useful cards though. This does also mean that the card will be less useful when you’ve got a small hand, because you might not actually get to use everything you’ve added back. The 3 Colour restriction does also mean you have to be very careful with how you build and play your Deck.
‘A new leader’ Naoe
Green / Level 3 / Cost 2 / 10000 / 2 Soul / 1 Soul Trigger
No Attribute
[AUTO] During your Climax Phase, if [‘Senior member’ Natsume], [‘Precision machine on the mound’ Rin], [‘Muscle revolutionary’ Masato] and [‘Simple idiot’ Kengo] are on your Stage, during that turn, all of your characters gain Power +10000.
Finally to finish off the Little Busters! previews we have what are presumably the box PRs that all work together to pull off a big combo. Naoe is the centrepiece, who can give everyone a 10,000 boost when accompanied by all his friends. This should allow you to strike through just about any defense, because you’ll be able to hit with 2 characters that will be at least 20,000 and 18,000 respectively and even at the bottom end you’re likely to have at least a 15,000 character.
Chances are, if you pull this off, your opponent’s Stage is going down. However it’s pretty unlikely you’ll be able to pull this off consistently, because the combo requires 5 characters, with 4 Colours between them, none of which are Level 0. This means that unless you control your Colour properly, you might not even be able to play them all at once. It also means that outside of the combo Naoe is fairly useless compared to other Level 3 cards.
‘Precision machine on the mound’ Rin
Green / Level 1 / Cost 0 / 5000 / 1 Soul / No Trigger
«動物 Animal»
[ACT] [(1)] During that turn, this card gains Power +2000.
The second piece of the combo is Rin, who can also act as an attacker during Level 1. Her ability will allow her to take on any opponent, provided you have the Stock, and could trade off with 1/1 or 2/2 vanillas for the equivalent Stock. She could also just be used to take down weaker Level 1 or below cards if you don’t have the Stock, or don’t need to boost her. She might find use outside of the combo deck, since she can act as a standalone card.
During the combo she’ll be at least a 15,000, making it hard for even most Level 3s to deal with her.
‘Senior member’ Natsume
Yellow / Level 2 / Cost 1 / 4000 / 1 Soul / 1 Soul Trigger
No Attribute
[CONT] Assist All of your characters in front of this card gain Power +1000.
[AUTO] [(1) Place 1 card from your Hand in the Waiting Room] When this card is placed on the Stage from your Hand, you may pay the Cost. If you do so, you may search your Deck for up to 1 [‘A new leader’ Naoe], [‘Precision machine on the mound’ Rin], [‘Muscle revolutionary’ Masato] or [‘Simple idiot’ Kengo], reveal it to your opponent, and add it to your Hand. Shuffle your Deck.
The 3rd piece of the combo is Natsume, who fills in one of the support roles as well as helping you to set up the full combo. 1000 Assist is a fairly regular for a Level 2, and whilst other kinds might be stronger, it’s probably a trade off for the fact he comes with a search effect. Thanks to the Assist effect, you could have a character as powerful as 21,000 when you pull the full combo off.
His second effect will allow you to search for another piece of the combo, which should make it easier to gather all 5 pieces.
Since he’s linked into the combo, you’ll only want to play him in that deck, since there are better support cards available for general use.
‘Muscle revolutionary’ Masato
Red / Level 2 / Cost 1 / 8000 / 1 Soul / 1 Soul Trigger
«筋肉 Muscle»
[AUTO] Encore [Place the top 1 card of your Deck in the Clock]
The main attacker after Naoe is Masato, who comes with Encore to keep him on the Stage longer, and make it easier to pull off the combo. At only 8000 Power he’s a bit small for a 2/1, but Encore will keep him on the Stage. Since it’s a Clock Encore, you don’t need to worry about expending resources to keep him around, but it does push you closer to defeat each time. He might possibly be used as a standalone card.
During the combo he can reach at least 18,000 and often 19,000, making him just about unbeatable for most Decks.
‘Simple idiot’ Kengo
Blue / Level 1 / Cost 0 / 4500 / 1 Soul / No Trigger
«スポーツ Sports»
[AUTO] [Place this card in the Waiting Room] When one of your other characters is placed in the Waiting Room from the Stage, and this card is in the Back Stage, you may pay the Cost. If you do so, place that character in it’s original Border in Rest position.
The final piece of the combo is Kengo, who acts as a pseudo-encore support card. When you lose a character, you can give him up instead to bring that character back. This will allow you to preserve characters that would otherwise have cost 3 Stock to keep around, or alternatively get around Anti-Encore cards. As such, Kengo could prove quite useful outside of the combo deck.
In the combo deck itself, whilst he might help keep other pieces of the combo around, his effect doesn’t really help pull it off. This is because if you want to use his effect, you have to give him up, leaving you missing a piece of the combo. This will probably mean that he’ll sit uselessly in the Back Stage, waiting to pull off the combo, unless you have extra copies in your Hand.
The final Little Busters! preview was merely another look at the Little Busters! Climax, so I won’t be covering that.
Come back soon when I’ll be starting on this week’s new Vividred cards.
